ClinCheck Pro®
Providers share their experiences using 3D Controls in ClinCheck Pro.
Dr. Brian D. Amy, DDS, MS
Dr. Brian Amy has been providing Invisalign® treatment since being certified in 2000 during his residency at Temple University in Philadelphia. He has taken a special interest in the efficiencies of Invisalign® treatment for patients and doctors. Dr. Amy has participated in multiple research studies that have resulted in journal publications and advances in Invisalign treatment.1
Tell us about the first time you used 3D Controls.
The very first time was quite the experience. It was a new tool, so I was eager to learn as much as possible about it. I’m certain I played with one ClinCheck modification for over an hour. I moved teeth all over the place, put an attachment on every tooth, added and removed IPR, and then reset…and then played some more.
There are some providers that have prewritten protocols and use them to send notes to the technician rather than using 3D Controls for treatment planning. Why should these providers be using 3D Controls instead?
I have heard of this practice. When my first ClinCheck treatment plan comes back, I limit my lengthy notes to big picture modifications. If I have filled out my original prescription thoughtfully, these large notifications should be minimal and are usually limited to the path a tooth is taking during its movement. If it’s a more precise detail that I would like to apply to the case, then a 3D modification is a MUCH easier adjustment to make rather than taking the time to try and express the request in written format to the Align technician. I feel that the Align technician and I are a team in setting up the case: The tech can make large modifications with ease, but the final details are in my hands with 3D controls.
Explain how you successfully implemented the use of 3D Controls in your practice?
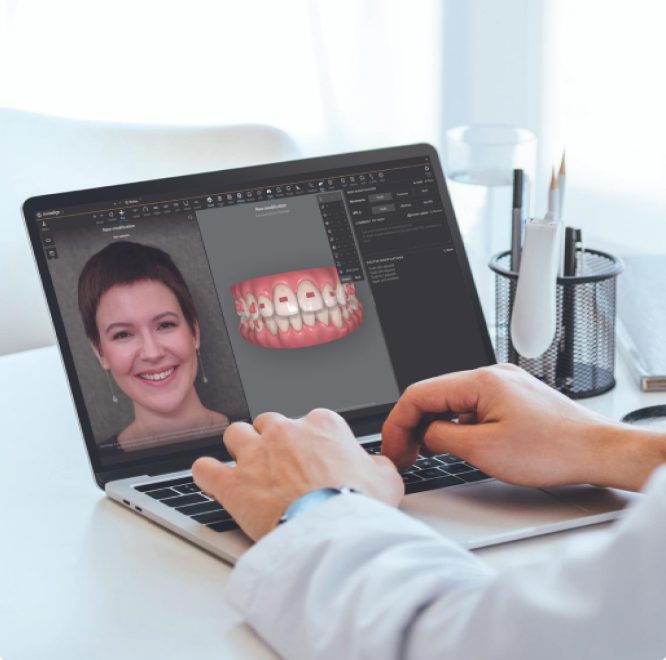
The biggest key was developing a systematic approach to ClinCheck review. In the past I would spend time worrying about minor details only to find that a larger movement was creating a roadblock that nullified my other movements. Now I start with a quick check of the initial stage of the ClinCheck with a comparison to the patient photos. I need to make sure the ClinCheck matches the patient’s occlusion. Next, a quick glance at the comments tab to see if the technician has found any issues with the case. Then, a jump to the final stage of the ClinCheck—here I am looking for the big pictures issues that will warrant a note to the technician. Then a deeper dive into the actual movements with an eye towards the optimized attachments and other Smart Force features. It’s at this point that I “take the wheel” with 3D Controls to modify tooth position, IPR, or even move a conventional attachment. By developing a system, I became efficient enough to run through a review in a matter of moments and have any modifications made quickly via 3D Controls. I can now quickly complete a typical ClinCheck review and modification.
What is the greatest benefit of using 3D Controls for treatment planning?
I know how I would like the ClinCheck to be set. I have a picture in my mind’s eye. It might not take 1,000 words to express that image to the Align technician, but it would certainly take longer than just letting me take control of the fine details. With 3D controls, I’m able to be the artist that makes the final touches on the patient’s treatment plan.
What is your favorite feature/tool in 3D Controls and why?
Ultimately, I suppose it comes down to the individual tooth movements. When I have 3D Controls active in a modified ClinCheck and I’m able to compare movements side by side with the patient’s original occlusion – that’s when I’m able to start “finishing a case” by anticipating overbite correction, overtreating a crossbite, or any other subtle nuances in tooth positions.
How is using 3D Controls in ClinCheck Pro a better experience than in previous versions of ClinCheck?
Most of the changes are very intuitive. I particularly like the introduction of blue and green precision arrows into individual tooth movements within 3D controls. In previous versions, precise movements were possible, but I could never quite remember which arrow I should click for a given movement. The precision arrows are now color coded blue or green to correspond to the larger arrow on the tooth in the ClinCheck software. Having the movements for the given tooth visible in the 3D Control chart is also wonderful. I know instantly if a tooth qualifies for an optimized attachment for a specific movement and I can even edit the value myself if I have a specific goal in mind. IPR placement and modification are very simple and efficient. Lastly, the ability to grab several teeth at once via the “shift” key function is wonderful when adjusting anterior vertical positions.
Dr. J. Don Spillers, Jr., DMD, MS
Dr. Don Spillers received his Doctor of Medicine in Dentistry from Dental College of Georgia, and his specialty in orthodontics from University of Missouri, Kansas City. Spillers Orthodontics opened in 1993. A Diamond Plus Provider, Dr. Spillers has treated more than 3,500 cases using Invisalign technology.1

Tell us about the first time you used 3D Controls.
The first time I used 3D Controls I was probably like everyone else, excited and intimidated. I was excited because of the ability to move teeth and attachments as I wanted them to be. I was intimidated because of the overwhelming number of options available to me.
There are some providers that have prewritten protocols and use them to send notes to the technician rather than using 3D Controls for treatment planning. Why should these providers be using 3D Controls instead?
I believe everyone should be using the 3D Controls to set up their cases. It allows us to sign our work or have full control over it, in other words. That is our job as orthodontists. It’s ok to use protocols to help the technicians get the case closer to what you want, but it should not be used instead of 3D Controls, but rather in conjunction with them. We have found it to be more efficient to use 3D Controls to get the final movements that we require for our patients. This stops all the back and forth with the technician on the ClinCheck treatment plans.
Explain how you successfully implemented the use of 3D Controls in your practice?
We have spent a lot of time using 3D Controls and teaching our ClinCheck Assistants how to use 3D Controls to help get the cases to a point where we are able to come in and do a final check and make any additional needed movements. Using 3D Controls is like anything else you implement in your office—you have to make it a part of your workflow to be efficient with it. In the beginning, we attended a lot of the “Ask the Expert” webinars offered by Align to help us get proficient with 3D Controls. You can find all of those webinars archived on the Invisalign Doctor Site.
What is the greatest benefit of using 3D Controls for treatment planning?
Using 3D Controls allows me a lot more flexibility in my treatment planning and more accuracy and control. It gives me the ability to see multiple options in making treatment choices. Especially in extraction cases and surgical cases you can treat the case and plan much better than without using 3D Controls.
What is your favorite feature/tool in 3D Controls and why?
That’s a tough question. The more you use 3D Controls, the more you rely on a lot of the tools in there. Some of my favorites are attachment placement, ability to move teeth, ability to view the occlusion, and bite jumps. These are all things you really can’t see any other way without producing models on a patient. The more you use 3D Controls in ClinCheck Pro 6.0, the more you will see their benefits.
How is using 3D Controls in ClinCheck Pro a better experience than in previous versions of ClinCheck?
The ClinCheck Pro 6.0 software is much better than previous versions. It’s faster, it has a better layout and user experience than before and it’s easier to navigate. It is very intuitive for users and is overall easier to use. I believe ClinCheck Pro 6.0 makes working with 3D Controls much easier for the new user. I highly recommend it.
Dr. Zachary Casagrande, DMD, MS
Dr. Zach Casagrande received his Doctor of Dental Surgery, Master of Science, and his orthodontic degree from the Medical College of Virginia (MCV). He is the founder of Northern Virginia Orthodontics in Ashburn and Reston, Virginia. He has been highlighted as one of the best in orthodontics by numerous publications including Washingtonian Magazine and Northern Virginia Magazine.1

Tell us about the first time you used 3D Controls.
I started using 3D control five or more years ago and have been using it ever since.
There are some providers that have prewritten protocols and use them to send notes to the technician rather than using 3D Controls for treatment planning. Why should these providers be using 3D Controls instead?
We have found that using 3D controls is not only faster for the doctor and the ClinCheck assistant, but also more accurate.
Explain how you successfully implemented the use of 3D Controls in your practice?
We had all our digital assistants complete a 3D Controls training. Now, not only are the doctors knowledgeable on how to use the features, but also all who help with ClinChecks.
What is the greatest benefit of using 3D Controls for treatment planning?
We have found that using 3D Controls for treatment planning allows for more accuracy and better patient results.
What is your favorite feature/tool in 3D Controls and why?
My favorite feature of the 3D Controls is being able to position the teeth based on the patient’s anatomy, exactly how I want to place them in all three dimensions.
How is using 3D Controls in ClinCheck Pro a better experience than in previous versions of ClinCheck?
3D Controls in ClinCheck Pro 6.0 give me more capabilities and greater detail control, so I am able to get the alignment and bite precisely where I want them.